October 15, 2024
Shopify Enhanced Conversion Tracking
Checkout Extensibility went live on 13th Aug blocking access to checkout.liquid and pausing any updates to checkout unless you upgrade. If you haven’t upgraded yet, your store's checkout will auto-update in Jan so it’s best to do it with intention and ensure a smoother transition. With checkout extensibility Shopify introduced a more seamless and secure checkout experience, improving CX, however poses a new set of challenges for marketers to implement tracking and conversion reporting.

While there are apps available in the market to do that for you, it’s not always feasible as most come with monthly recurring fees, which add up over time, and in other cases too basic with no scope for any customisation. The Google & YouTube channel app is a good alternative however, still lacks features like Enhanced Conversion reporting. Due to this, you might be looking to implement EC for Google ads and the lack of information available out there isn’t helpful.
This guide will cover all the steps you’d need to implement EC for Google ads irrespective of the state your checkout is in. You might have done a partial upgrade of only the checkout or full upgrade with checkout and thank you page. We have added steps that will help you in both scenarios:
To implement EC on Shopify, Go to Admin > Settings > Checkout
Based on the setup found here we’ll proceed:

Scenario 1
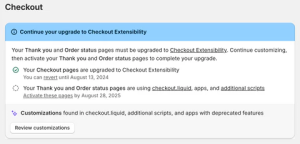
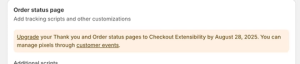
Store is Using Upgraded Checkout but the Thank You Page isn’t upgraded. It looks something like this on Shopify:
and paste the following code:
<code>
<!– Global site tag (gtag.js) – Google Ads: AW-XXXXXXXX by Velstar –>
<script async src=”https://www.googletagmanager.com/gtag/js?id=AW-XXXXXXXX”></script>
<script>
window.dataLayer = window.dataLayer || [];
function gtag(){dataLayer.push(arguments);}
gtag(‘js’, new Date());
gtag(‘config’, ‘AW-XXXXXXXX, {‘allow_enhanced_conversions’: true});
</script>
<script>
var enhanced_conversion_data = {
“first_name”: “{{ checkout.billing_address.first_name }}”,
“last_name”: “{{ checkout.billing_address.last_name }}”,
“home_address”: {
“street”: “{{ checkout.billing_address.street }}”,
“city”: “{{ checkout.billing_address.city }}”,
“region”: “{{ checkout.billing_address.province }}”,
“postal_code”: “{{ checkout.billing_address.zip }}”,
“country”: “{{ checkout.billing_address.country_code }}”
}
}
if(“{{ checkout.email }}”){
enhanced_conversion_data.email = “{{ checkout.email }}”;
}
if(“{{ checkout.billing_address.phone }}”){
enhanced_conversion_data.phone_number = “{{ checkout.billing_address.phone }}”;
}
</script>
{% if first_time_accessed %}
<script>
gtag(‘event’, ‘conversion’, {
‘send_to’: ‘AW-XXXXXXXX/XXXXXXXX,
‘value’: {{ checkout.total_price | divided_by: 100.0 }},
‘currency’: ‘{{ currency }}’,
‘transaction_id’: ‘{{ order_number }}’,
});
</script>
{% endif %}
</code>
If you are using any other app to track conversions, please ensure the other app is sending Transaction ID to dedupe the conversions otherwise it can overinflate the numbers and it would be recommended to turn one of the methods off.
You must ensure EC is enabled on the account and the method of implementation is selected at GTAG
Scenario 2
Store using fully upgraded Checkout:
Head to Customer Events (if customer events is greyed out for you, reach out to store owner to give you access first):
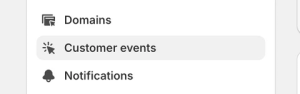
And click on add a custom pixel and Name it something easy to remember (ex GTM)

Here, we can submit direct Google Ads GTAG, however for greater control and privacy settings, we will use GTM
Paste the following code in the custom pixel:
<code>
//Created by Shubham Sharma, Head of Paid Search at velstar.co.uk
//Reach out in case of any questions
(function(w,d,s,l,i){w[l]=w[l]||[];w[l].push({‘gtm.start’:
new Date().getTime(),event:’gtm.js’});var f=d.getElementsByTagName(s)[0],
j=d.createElement(s),dl=l!=’dataLayer’?’&l=’+l:”;j.async=true;j.src=
‘https://www.googletagmanager.com/gtm.js?id=’+i+dl;f.parentNode.insertBefore(j,f);
})(window,document,’script’,’dataLayer’, ‘GTM-xxxxxxx’); //Insert GTM ID
analytics.subscribe(“checkout_completed”, (event) => {
window.dataLayer.push({
event: “vs-purchase”,
ecommerce: {
transaction_id: event.data.checkout.order.id,
value: event.data.checkout.totalPrice.amount,
currency: event.data.checkout.currencyCode,
email: event.data.checkout.email,
phone: event.data.checkout.phone,
first_name: event.data.checkout.shippingAddress.firstName,
last_name: event.data.checkout.shippingAddress.lastName,
address1: event.data.checkout.shippingAddress.address1,
address2: event.data.checkout.shippingAddress.address2,
city: event.data.checkout.shippingAddress.city,
country: event.data.checkout.shippingAddress.country,
countryCode: event.data.checkout.shippingAddress.countryCode,
province: event.data.checkout.shippingAddress.province,
provinceCode: event.data.checkout.shippingAddress.provinceCode,
zip: event.data.checkout.shippingAddress.zip,
items: event.data.checkout.lineItems.map(lineItem => {
return {
item_name: lineItem.title,
item_id: lineItem.variant.id,
item_brand: lineItem.variant.product.vendor,
item_category: lineItem.variant.product.type,
item_variant: lineItem.variant.title,
price: lineItem.variant.price.amount,
quantity: lineItem.quantity,
}
})
}
});
});
</code>
Head to your GTM account and import the following JSON file in your GTM account:
Please ensure you change the variables:
vs – constant – Google Ads Conversion Label
vs – constant – Google Ads ID
These can be found in Google Ads > Goals > Conversions > Summary > Selecting the GTAG Purchase Goal > Tag Setup > Google Tag Manager
You must ensure EC is enabled on the account and the method of implementation is selected at Google Tag Manager
Recommendations
In either scenario, my recommendation would be to implement using GTM (scenario 2) as it works irrespective of the level of checkout upgrade. It’s important to check your GTM setup and find out if it’s not already part of your theme.liquid and how other tags are implemented as the tags setup using theme.liquid events and dataLayers might stop working. Try to avoid installing GTM using multiple methods.
Testing with Custom Pixel is a bit difficult as the conversions load in a sandbox, and you must use the old and trusted “Tag Assistant Legacy” Extension, as the newer https://tagassistant.google.com/ will not read any data from Custom Pixels due to privacy sandbox.
To send Consent Mode signals there are only a few extra steps however they are out of the scope of this guide. Add me on LinkedIn for CM v2 and updates to Google Ads, GA4, EC, and more.